July is one of my favorite gardening months, because it feels like a pause. All your vegetables are planted and should be on their way to fruiting. The flowers you got in the ground the last two months should have started to bloom, and the weather isn’t murderously hot yet. There is lots of harvesting to be done, and fall to start thinking about, but I spend a lot of July just walking around the yard, appreciating what’s there.
The daily survey
I wasn’t kidding about taking a daily lap around the garden, which I try to do before the sun is too high in the sky. Each morning, I walk around with my garden hod, and a bucket. Take note of how things are doing and what needs more water or perhaps a fertilizer boost, and look for infestations. If you see a weed, pick it and chuck it into the bucket. If something needs to be harvested, add it to the hod. Top up your water features and bee stations and try to spend a few moments just sitting and appreciating all the hard work over some snap peas or raspberries.
Water, water everywhere
The headline for this month is dialing in irrigation since it’s likely the first time this year you really need it on a consistent basis. As temperatures climb, it’s imperative to have consistent water at the root of plants. Test your irrigation or watering systems if you haven’t yet and get them turned on. Check in for the first week or two and make sure the ground is getting moist about six inches under the topsoil and adjust the water as necessary. It’s never too late to mulch to conserve water and protect plant roots. Remember that you want a nice thick layer of mulch, an inch isn’t going to do much. Make sure to pull that mulch away from the stems of your plants.
Deadhead to create stronger and more prolific blooms
Most of the summer blooming flowers are “cut and come again” blooms. Cut the flowers and a good stem, and the plant will come back with a stronger, branched stem. Some flowers, like stock, are single bloom (they bloom only once, on one stem, so chop it and it’s over). But zinnia, echinacea, and snapdragons thrive from a chop. This means a summer full of cut flowers, but even if you let flowers stay on the plant, be sure to deadhead every day or so.
Turn over peas and other spring vegetables
At some point around now, your peas will start going brown and crispy from the bottom up. This just means it’s time to turn over the space for summer, and hopefully you have some climbing beans or something else to go into the space. Your spinach, boy choy, and spring broccoli, cauliflower and cabbage have all also flowered by now, so those spaces are ready to turn over for summer or fall.
Sometime this or next month, garlic is going to be ready to come out of the ground, too. Wait for three or four brown leaves and then harvest with a hand spade (do not try to just pull them out of the ground).
If you got potatoes into the ground in spring, you can start harvesting them as soon as they plants begin to flower. Use a spade to turn over the earth and then use your hands to find all the baby potatoes. You can let really tiny seed potatoes fall back into the bed, which will help it perennialize.
Succession plant flowers, lettuce, radish, scallions, beets, kohlrabi and other greens
In the newly empty spaces, remember to keep succession planting going. Get seeds in routinely or starts from the nursery. If you go with seeds, you’ll need to work harder to keep them hydrated so they germinate, once they’re in the ground.
Harvest your berries
It is berry season, so be sure you’re getting all of your berries harvested as they’re ready. Raspberries should be coming to an end, with blueberries in full swing. At some point this month, strawberries will be dunzo, which means you can cut them back fully so they can focus on roots for next year instead of runners. I run the lawnmower over them to accomplish this.
Fall planting
You should have your fall starts started by the end of July, if you’re growing from seed. These starts won’t go in for a month or two, which gives you enough time to get a tray of seeds going now.
July is a great time to reset the seeding station at your house. All the summer starts are in the garden at this point, so you have room to put time and energy into succession plantings, fall starts and perennials. Even better, you don’t have to grow the starts inside—you can use your seed trays outside in the sun. I set up a bank of trays in the driveway, in full sun, and ensure they have a bottom-watering tray (that's a tray filled with water underneath the seed tray so that the soil can always draw whatever water it needs). I use tray domes (the clear plastic dome that sits on top of the seed tray to maintain moisture) sparingly because of the high heat outside. On really hot days I remove the domes, so the seeds don’t fry. As soon as there’s even the tiniest show of germination, the domes come off permanently.
Succession seeding
Most years, I get a little cocky this time of year and don’t stay on top of my succession planting—and then regret it. This year I'm starting “Succession Saturday,” where every week I force myself to get out, evaluate what needs turnover, and make sure I plant a few lettuces, radishes, beets and kohlrabi.
Get ready for fall
Hopefully, you now have all your fall planting seeds ordered and received and know what you need to plant. July is when you’ll want to get these starts going, so that they’re ready to get slotted into gardening spots in late August/early September. As your summer plants get cleared out, you’ll replace them with fall. Think about your winter hearty vegetables (which, admittedly, is a little tough when it’s 100 degrees out)—cabbage, broccoli, cauliflower, root vegetables, etc.
Perennials
Spend a moment thinking about every expensive perennial you fawn over at the nursery. Unless they're vegetable starts, these plants can really take a tool on your finances. So grow them yourself, either from seeds or from a clipping. If you can find someone with one of these perennials, you can usually grab a healthy clipping, strip the end, dip it in rooting powder and get that little guy into some potting soil. You can also do this to duplicate your own plants. If not, get some seeds and get to work. Instead of paying $30 for a coneflower this summer, grow 10 of them for $5 in seeds. If you start now, you’ll have a four-inch pot sized plant by fall.
Michel Roux Jr has been at pains to say that he’s no longer chasing Michelin stars, but is that possibly a way to manage expectations?
Hot on the heels of Michel Roux Jr shutting up shop at the much-genuflected-over Le Gavroche, he’s recently opened Chez Roux at the Langham hotel in central London. Roux has since said that he does not plan to cook much at all from now on: daytime TV and caring for his grandkids are much more his penchant these days, he says, rather than sweating over homard grillé and salsifi au beurre noisette.
And who can blame him? Fine-dining restaurants may be glamorous, but cooking in them is hot, filthy, smelly and often thankless. Roux deserves endless happy, horizontal moments wearing his athleisure pants while solving the ad-break conundrums on Countdown, but where that leaves Chez Roux is something of an enigma. It operates evenings-only in the Palm Court space of the hotel, which cannot fail to feel chintzy no matter how much they spend on modernist objets d’art, because its tables are rather low and the accompanying velvet chairs are on the low side, too. This is the sort of low table you more commonly associate with a seaside fortune teller, and causes even a titch of a woman such as myself to stoop over her lemon sole meunière.
Chicory produces bitter, tangy leaves – and is surprisingly easy to grow from seed
Now that we’re at the height of summer growing season, and tomatoes and courgettes are making their way from plot to dinner table, I’m reluctant to start thinking about the inexorable return of leaner months. Yet now is the time to sow radicchio and chicory seeds if we want their flavoursome leaves on our plates when the weather cools.
Last season – on the farm where I work – was the first time I’d truly experienced the glorious sight of these leaves growing through winter. If sown in trays around now and planted in the ground in a month or so, the crops will have plenty of time to develop a robust root system, a tight heart and a chubby head of greenery before the weather shifts and halts growth. The outer leaves are tough enough to endure a battering from harsher weather and they can develop a slimy exterior as they break down which, when peeled away, reveals the most divinely vibrant, crisp leaves that taste delectably bitter. The closer they are to the centre – where the sun’s light hasn’t reached – the gentler and sweeter their taste.
For eagle-eyed viewers, a clutch of cookbooks by Australian chefs and authors such as Peter Gilmore feature in the series – and one is selling for $900 online
Ever since The Bear debuted in 2022, the show has induced a level of obsession from fans. Interest in Carmy’s patchwork jacket from season one led to the discontinued design being resurrected, and audiences struck by the Trent Reznor and Atticus Ross song from season three’s premiere sparked a streaming spike for an obscure Nine Inch Nails album.
Then there’s the food, which has seen fans attempt Sydney’s potato-chip omelette and Marcus’s chocolate cake. And for eagle-eyed viewers, there are the cookbooks that appear throughout the show: alongside influential titles by René Redzepi and Julia Child are a clutch of Australian cookbooks that have made their way into Carmy’s apartment and the shelves of his restaurant.
Investment bank Stephens hired to find suitors for business, which wants to expand overseas operations
The high-end steakhouse chain Hawksmoor has been put up for sale in a deal that could value it at about £100m.
The restaurant chain has hired the investment bank Stephens to start looking for potential suitors for the business, which is hoping to expand its overseas operation.
Five bulls from the area around a Kenyan wildlife reserve have been shot and killed in Tanzania in recent months. The countries have very different conservation strategies.
Enlarge/ Scientists have observed wound care and selective amputation in Florida carpenter ants. (credit: Danny Buffat/CC BY-SA)
Florida carpenter ants (Camponotus floridanus) selectively treat the wounded limbs of their fellow ants, according to a new paper published in the journal Current Biology. Depending on the location of the injury, the ants either lick the wounds to clean them or chew off the affected limb to keep infection from spreading. The treatment is surprisingly effective, with survival rates of around 90–95 percent for amputee ants.
“When we're talking about amputation behavior, this is literally the only case in which a sophisticated and systematic amputation of an individual by another member of its species occurs in the animal kingdom,” said co-author Erik Frank, a behavioral ecologist at the University of Würzburg in Germany. “The fact that the ants are able to diagnose a wound, see if it's infected or sterile, and treat it accordingly over long periods of time by other individuals—the only medical system that can rival that would be the human one."
Frank has been studying various species of ants for many years. Late last year, he co-authored a paper detailing how Matabele ants (Megaponera analis) south of the Sahara can tell if an injured comrade's wound is infected or not, thanks to chemical changes in the hydrocarbon profile of the ant cuticle when a wound gets infected. These ants only eat termites, but termites have powerful jaws and use them to defend against predators, so there is a high risk of injury to hunting ants.
I have written before about how trellises are essential to your garden layout to create height and divide spaces; a trellis takes a garden from flat to immersive. Once those trellises are up, finding the right plants to cover them becomes the next challenge. You want to choose plants that will grow enough to cover your trellis without being so aggressive you still have to constantly prune them. You also want to consider if you’d like the effect of the vining plant temporarily, permanently, or seasonally.
Annual vines will cover a trellis without becoming a problem
An annual plant is only good for the season, and it will die at the end. Sometimes, these plants perennialize, meaning they could come back year to year. For instance, nasturtiums are a wonderful climbing plant if you chose the right variety (there are climbing nasturtiums and trailing nasturtiums) and train them. I use gardening Velcro tape to train the nasturtium shoots up any vertical surface, and they grow magnificently on a tunnel if you spend a little time training them at the beginning, weaving them through the tunnel in the direction you want them to go.
For a noticeably short season, there is nothing that compares to sweet peas. Easy to start, easy to train, these climbing vines can crawl to almost nine feet and if you prune them correctly, will last a few months, bearing incredibly sweet-smelling flowers. The key to keeping the sweet peas alive that long is consistent deadheading. I am out every third day cutting sweet pea blossoms to prevent the plant from going to seed, but that means everyone around me always has a bouquet this time of year.
Vining beans are aggressive climbers, but not so much that they will be a problem for your structure. At best, they survive three or four months, and can grow as tall as 12 feet. Start by ensuring you are growing pole beans and not bush beans. Traditional filet, haricot vert, or shelling beans all thrive on a trellis with some support. Each year I grow massive trellises of white cannellini beans and Greek Gigantes beans. Beans such as pole runners, which are often grown simply as hummingbird bait, have colorful flowers and grow prolifically.
If you like petunias, you will like their lookalike vine thunbergia, also called black-eyed susan vine. A vigorous climber, I really like thunbergia for poles, using Velcro tape or a Slinky hung from the top of the pole to create support. A nice feature of this plant is that when it runs out of support, it flops over on itself instead of seeking out new structure.
Perennial vines come back year to year
If you’re looking to cover a good amount of space and create a feature that will come back year after year, there are a wealth of options. The issue with perennial vines is that they keep growing. That means you must be careful about pruning and ensuring that they are not intruding on the structure they are trellised again, and that those trellises are winter hardy.
Roses may seem pedestrian, but the last twenty years have seen an influx of designer roses, even in the climbing rose variety. They can be deeply scented, and colorful and climbing. I am particularly drawn to Floribunda roses, which look like peonies rather than a stereotypical rose. Roses require some attention because you need to really train and maintain them. They need specific food and specific pruning. But if you have the right space, few things are as majestic as a wall of roses. There are hundreds of varieties; depending on which of the three pruning groups a variety falls into, it can be extremely aggressive or less so. The flowers can look wildly different, from blooms that resemble lilies to tinier flowers that resemble jasmine.
Of all the vines I’ve planted over the last ten years, the passionflower vine was the best choice. It grows aggressively, doubling in size year to year, and requires very sturdy trellising. But the flowers it produces are so interesting-looking and last year I was finally blessed with one picture perfect passionfruit. Passionflower would thrive on a wire wall trellis, but it is not the most winter hardy.
Climbing hydrangea is a slow burn. It won’t grow fast, but it will reliably climb a trellis and spread over the years. What I enjoy about my climbing hydrangeas is that they consistently have a great cover of foliage in spring and summer without requiring a lot of care on my part. I never prune them.
Grape vines are the ultimate climbing perennial. While they will, of course, produce grapes, they can form a gorgeous structure as well, providing edibles through the fruit and the leaves themselves. Grapes need a lot of care, and anyone who plants them needs to be vigilant about maintenance. The grapes themselves can also attract wildlife if you don’t pick the grapes and clean up the fallen ones.
Evergreen vines have year-round foliage
More than just a perennial, evergreen vines will keep some foliage all winter long instead of all the leaves dropping. This opens up some interesting options for long-term vines in your yard.
If you have a yard, that yard should have jasmine in it. While I’ve never been drawn to the artificial jasmine in perfume or candles, real jasmine is magical when you get a whiff of it at twilight, when it is most fragrant. A prolific growing vine, jasmine is surprisingly hardy through the winter, too.
Once you realize you love hummingbirds, it is just a hop and skip to honeysuckle vines. If you buy different varieties, you can always have one in bloom all spring and summer. The flowers vary in color from yellow to red and blazing pink, and the trumpet-like flowers are a siren for birds and bees. Like jasmine, these plants need solid support throughout the year.
One variety of clematis (clematis armandii) is evergreen. It’s a little harder to get ahold of, but if you can find it, this white-flowered vine will stay green through most of winter.
Please don’t grow these vines
There are some vines you should avoid—not just for you, but your neighbors and the local environment. Some vines are just too aggressive to be unleashed in the wild, no matter how much you like them.
Wisteria, though absolutely beautiful, will damage any structure it’s on. It is such an aggressive climber and can grow into attics and through your siding.
Only real jerks plant ivy. Almost all ivy will become invasive, choke out other native plants. A pervasive spreader, it’ll quickly become your neighbor's problem.
No one purchases kudzu, but it may pop up in your yard and is a serious problem across a growing part of the U.S. if you find it in your yard, you need to begin aggressively working to remove it entirely. In some place it is not even legal to keep it.
This is the summer I urge you to ditch those expensive, cheaply made pine trellises you can find at big box stores. They’re never big enough, they rot after a few seasons, and they are never strong enough to act as a decent trellis. This year, let’s commit to making a long lasting wall trellis that looks completely professional and will save the structure of your house from damage by plants.
The fundamentals of wall trellising
A trellis has two functions: First, to give the plant something to hold onto and direct it where to grow, to help give it support and structure; second, to hold the plant far enough away from the structure to protect it from damage. Plants are resilient creatures that seek structure and will cling to your house siding and gutters if that's what's easiest.
No matter what plant you choose to trellis, you’ll still need to provide upkeep for the plant, whether that’s annual pruning, feeding, or helping it along the trellis. When the plant runs out of trellis, it’s headed for your roofline, and you’ll need to keep that in check, too.
Tools you’ll need for a DIY trellis
To create a wire trellis, you’ll need:
Eye hooks to act as anchors and hold the trellis away from the wall,
A crimper to to lock the crimps in. (There are different sizes of wire, crimps, and crimpers, so you should choose based on how heavy the plant will be. As a general rule, I use 20-gauge wire for light plants like Clematis and much heavier 9-gauge for heavier plants like roses.)
Silicone caulk to seal drill holes and prevent water damage.
To plan out the trellis, sketch the wall you’ll be using with accurate measurements. Start laying in where the anchors will go. You don’t need to start your trellis lower than three feet above the ground. You don’t need to cover your entire wall, either; you can choose where the trellis will go to guide the plants. For instance, a trellis could stretch above your windows and across the wall, to give plants grown on either side a path that keeps them off the windows.
For each of the eye hooks, you’ll want to pre-drill into the siding or concrete using the appropriate bit (and anchor, if necessary). Next, add some clear silicone caulk to the hold and then screw in the eye hook. The silicone should seal the hole so water can’t intrude into the house.
With the eye hooks in place, you can now choose the pattern you’ll use for the wire. You can use a plain grid or diagonal grid, but there are no rules for how you string the wire, meaning you can use any geometric shape you choose. While roses might not follow the shape precisely, smaller vines like jasmine likely will, revealing the shape on the wall.
Credit: Amanda Blum
To set your first wire in place, slide a crimp onto the end of the wire and then loop the free end of the wire through your eyehook and back into the crimp, creating a loop. Slide the crimp as close to the eyehook as you can and then use the crimp tool to clamp the crimp onto the wire. Spool the wire to the next eyehook, cut enough to make the loop, being generous, and repeat the step. Make sure the wire is taut before you crimp it. To accomplish this, it’s nice to have a pair of pliers to hold onto the wire to pull it. Now, you just repeat this process over and over until the grid of your choice is done.
Vining plants come from the nursery tied to a wooden stake, so the first thing to do is remove the plant from that stake. Carefully unwind it, and then remove the plant from the plastic pot and plant it at the base of the trellis. Drape the vine onto the lowest rung of the trellis, and secure it to the trellis using velcro tape. The tape should only be tight enough to hold the vine in place. If it's too tight, it will strangle the plant, so give as much slack as you can. The velcro tape can be readjusted in the future.
Maintenance and upkeep
As the plant grows, you’ll train the plant to attach itself to the wires by using the velcro tape and anchoring it in the direction you want it to go. You can treat it as any other plant by making sure it has food and water, and ensuring it gets pruned when it should.
In these few short years, America's newly opening landscapes—residential, rural, and the fastest routes between them—were given a visual identity by the federal government. If olive drab and its ilk were the colors of Tom Brokaw's Greatest Generation, then the hues of the first revision were those of America's well-branded internal expansion. Every mailbox, park sign, and highway mile-marker was another tiny flag planted by a growing nation, proclaiming its new success with the same methods and military sensibility that had recently secured it a starring role on the international stage. Though they're brighter and friendlier, the colors and rules that dictated the look of American infrastructure's mid-century boom are every bit as ordered as a dispatch from the Quartermaster Corps. from Americhrome [The Morning News]
Every year, my stone fruit trees sprout a comforting number of cherries, plums, and peaches. But by the time I should be harvesting, 90% of it is gone. It’s as if I can hear the birds laughing at me. For every perfect strawberry, there are four that have gotten hit by pill bugs before they ripened. Our fruit is highly susceptible to local foraging wildlife, bugs, and even sunburn. Here are all the ways you can protect your fruit so it’s there for you when it’s time to harvest.
Gauze your plants
In order to get fruit, you need pollination. But once that pollination occurs, and you have unripened fruit on your trees or shrubs, you can cover it to protect it. If it’s an entire tree, you can shroud it with a veil, but for individual fruits, you can also use gauze bags specifically for this purpose. The gauze allows light through, but not bugs or birds. I prefer the bags because they’re less likely to trap pollinators or birds. I have started using the bags on my grapes because I found it made them far easier to harvest. You simply plucked the bags away, with the grapes already contained. You can protect your perfect figs or apples, too, using this method. So far, I’ve been highly pleased with the success rate and at the end of the season, I wash the bags.
Kaolin clay on your fruit trees
You can make a slurry of kaolin (a benign powder of refined clay) and spray your fruit trees with it. The clay coats the fruit in a harmless coating that deters pests by disguising the fruit. Smart bugs who can still find the fruit are going to become more occupied with grooming those clay particles off of themselves and will eventually give up and leave. The benefits don’t end there: The kaolin protects the fruit from sunburn, too. This method is more labor intensive, because you have to spray once a week to build up a suitable layer of clay. Since this method can deter the apple maggot, plum curculio, codling moth, European apple sawfly, cucumber beetle, oriental fruit moth, tufted apple bud moth, white apple leafhopper, and pear psylla, I’m going to try it for the first time next year on the apple and pear trees that bear too much fruit to sleeve in gauze.
Distract and deter for strawberries
When bugs aren’t trying to worm into strawberries from below, birds are trying to get to them from above. The birds are easily distracted by red rocks the size of strawberries, painted the same color red, spread around your berry patch. I’m amazed each year at how effective this low-effort method is. Deterring bugs, however, is a little harder. Pill bugs can be deterred by diatomaceous earth (a finely crushed plankton)—but although it’s organic, I try to avoid using it because it can harm beneficial insects in the soil, too. I’ve resorted to elevating the berries to eliminate the problem. Every spring, as soon as the berries start to produce runners, I add a hefty amount of straw to the berry bed, so the berries will sit on top of the straw once they ripen. I’ve also started to plant most of my berries in vertical planters, so they hang, rather than sit on the ground. These two methods have greatly increased my fruit yields.
Shade cloth to avoid sunburn
Sunburn has become a bigger problem in recent years due to heat domes and plants that are not prepared for that kind of prolonged direct sunlight and heat. The most effective way to protect plants is to create an overstory and understory, so your berries (the understory) are protected by trees overhead (overstory). If you can’t do this, it’s time to create some trellises or temporary structures from which to hang shade cloth. This UV-blocking fabric allows airflow but blocks out a percentage of the UV from the sun (it comes in varying degrees of UV blocking). It doesn’t harm the fruit in any way, so long as it’s not on the fruit, but hung above it, creating shade.
Plant sacrificial fruit
Though I have many blueberry bushes, I started with one large one, and I made an agreement with the birds. “You get the top; I get everything else." Now I have enough berry plants around the property that there’s plenty to share. Planting pollination stations with native berries will be a distraction for the local wildlife population.
Traps and beneficial insects
Each kind of fruit has natural predators, and they likely make traps for those insects. Check your nursery for them—they’re usually cardboard and sticky, and come with a specific pheromone. They can be hung in the area of your fruit and be changed out every so often. You can also consider beneficial insects, where you purchase the predators of the problem pest, introduce them to your garden and hope they want to stay.
It is truly luxurious to have a garden where sprinklers and drip irrigation are already present, but that’s not the case for most people with gardens. That means people spend a lot of time and wasted water on cobbled-together systems involving hoses, timers, and those awful oscillating sprinklers. These overhead watering sprinklers aren’t precise, so water is wasted and rain down water hard enough that they can lead to virus and fungus spreading in the garden as the water bounces off the soil and back onto plants—plus, they’re always in the way, with hoses snaking across the lawn. Soaker hoses coming off your hose bibb aren’t much better, breaking down in a few summers and leaking endlessly. A better solution is to water via a real dripline at the root and put sprinklers only where you need them, focused specifically on the small areas they should water. While it is certainly better to have a real drip or sprinkler setup, there are a variety of ways you can accomplish a semi-professional watering system on your own, using the same tools to achieve a much cleaner look in your yard.
Divide up the space into zones
The first thing you’ll need to do is divide your yard into zones. Sketch out your whole garden and all your boxes and grass spaces—anything that needs to be watered. The grass is one zone, and perhaps all your garden boxes are another. The zones can be based on area instead, so you simply divide your yard into four smaller areas. A zone will all be watered at once, so what you’re really considering is what areas need the same amount of water. You don’t want to overload any one zone, since your hose bibb has less pressure than the main water line (you can run a test on your hose bibb to see how much pressure it has). Since you won’t be tapping directly into your waterline, using your hose bibbs instead, the zones must relate to the location of the bibb. Note all the bibbs on your sketch and then look at how each zone relates to that hose bibb. If you had to run a line to that zone from the bibb, where would it go? It’s OK if it just runs on the ground next to the house, but draw it out, trying to arrive at the shortest distances possible, since unlike professionally installed lines, you’ll see these above ground. Minimize how much line you’re using, how many turns it takes, and crossover of lines. Now, go outside to start measuring those lines and visualizing each turn so you can translate that to fittings.
I used color lines to divide this area of my yard into zonesCredit: Amanda Blum
Attach timers and run blank line to each zone
Although most people don’t know this, in most places even the driplines or overhead oscillating sprinklers you run should have a backflow prevention device, per city code. This prevents the water, once it leaves the hose bibb, from flowing back into city water. These small devices aren’t hard to install inline; you just attach it to the hose bibb before any timers. You’ll want to control each zone it independently. Since we’re not using a professional watering timer, you’ll use hose timers. There are a number of smart hose timers, and having tested a number of them, the one I prefer is Racchio, which still occasionally has leak issues, but is better than other brands like Bhyve. I also continue to use non smart timers like Orbit, which have the benefit of having multiple outlets, so you can run many zones off one timer. Otherwise, you’ll need a splitter coming off the hose bibb, and then a smart timer on each outlet.
Now we’re going to start laying down the tubing that will take the water from your hose to the zone, and to do that we’re going to use blank tubing. This means there isn’t any holes in it, so it won’t drip. This tubing is usually a golden brown, so it will disappear into the landscaping. It accepts 17mm fittings, so whether you need an elbow, tee, or straight connection, they’re easy to source. Run this tubing from the hose all the way to where your zone starts, making all the connections you need. A final fitting at the start of the tubing will allow you to connect the pipe to the timer. Repeat this for each zone. The goal is to tuck the tubing out of the way by going around the yard. While this isn’t as good as a buried line like a professional install, the tubing you’re using is far more reliable than a hose, and less conspicuous.
Credit: Amanda Blum
Attach micro emitters, sprinklers, and dripline
Now that the line is run to your zone, you can start attaching watering lines. For a dripline, you connect tubing that has holes in it and will slowly leak water out of it. You want to run this in a circle so it gets consistent pressure, but the tubing is the same diameter and style as the blank line, so you just use additional fittings to connect it. This is the ideal way to water a large area like planting beds around your lawn or raised beds.
You can also connect micro emitters for specialty watering needs like planters or a particular plant that needs its own emitter. You will use smaller ¼ line and fittings to connect these emitters to the main watering line. Using a punch made specifically for this, punch a hole in the main line, and then using a straight fitting on the end of the ¼ line and secure that in the hole. Place any kind of emitter on the end, and use a stake designed for this purpose to hold the emitter in place. The nice thing about emitters is that you can adjust each individually. So if one pot needs more or less water, you can make an adjustment or turn it off entirely. The smaller ¼ line makes it easy to jump from the main line up into planters.
You can use the same ¼ line for micro sprayers, which will act as sprinklers here. There are even pop-up micro sprayers, which mean that when not in use, your sprinklers disappear into the lawn. You simply need to dig a hole about three inches in diameter, as deep as the sprayer stake. Place the sprayer stake in, and then backfill the hole. I like this application as you can easily change out the sprayer head to a 90, 180, or 360 degree angle and then position it as needed. The spray is really fine, but it works well for smaller areas.
How to maintain it
At the end of each season, you need to blow out your tubing (with an air compressor), because it is above ground rather than below the frost line: This will ensure there’s no water left in any of the tubing. In spring, you’ll want to test each line and ensure each of the pop-up sprayers pops up and the emitters are in the right position. Walk around and listen to each zone; you’ll hear if there’s a leak or tear in one of the lines and can fix it by cutting the tubing in that spot and repairing it with a coupler.
Rattled by tech’s latest trend, businesses have turned to advisers at Boston Consulting Group, McKinsey and KPMG for guidance on adopting generative artificial intelligence.
Rattled by tech’s latest trend, businesses have turned to advisers at Boston Consulting Group, McKinsey and KPMG for guidance on adopting generative artificial intelligence.
When everything in nature aligns as it should, plants form flowers, then bees and other pollinators drop in to grab the pollen from those flowers, and as they flit from one blossom to the next, they redistribute that pollen. Some of that pollen will likely have come from a male flower and will end up on a female flower, and boom: pollination. That pollinated flower should now produce a fruit.
But sometimes, conditions aren’t ideal. Whether because of a lack of pollinators or a lack of flowers, sometimes the conditions work against the natural order of things. If you’re nursing an indoor plant where there aren’t pollinators at all, or you’re just anxious and want to control the pollination process, you can do so via hand pollination. Here are four ways to make the magic happen.
Direct flower pollination
Some plants have such big flowers with pronounced stamen (male) and stigma (female) that the easiest way to hand pollinate is to just grab one of the male flowers, tear off the petals and use the stamen like a paintbrush. Lightly brush the stamen against the stigma of any female flower you want to pollinate. This has a really high success rate, because it’s so hard to mess up.
This method works wonderfully on pumpkins, all squash including zucchini, summer and winter squash, and melons. Once you’ve pollinated, just sit back and wait a few days to see the fruit start to develop.
Paintbrush pollination
Though the previous technique includes a paintbrush-like motion, this technique involves a literal paintbrush. Although almost every article you'll read about hand pollination mentions the paintbrush method, I personally find it to not have a high success rate. As such, I only use it when it’s the only method that’ll really work. A great example is citrus, which I hand pollinate in wintertime, inside. The flowers are small, but not as tiny as cucumber or tomato, for example. Every citrus blossom has both male and female parts, so every single blossom can become a fruit.
Using a very clean, dry paintbrush, you softly paint the male portions (which are around the center), then swab it lightly across the female portion, right in the center of the flower. Then do this for every other open blossom. While I have limited success with this method, if you don’t have bees, it may be your only option.
Shaking pollination
Corn grows tassels, which have pollen on them. The wind carries that pollen to receptive corn silks. In big planting blocks, this is a reliable method, but home gardeners don’t plant enough corn to have 100% success. So shaking the tassels by hand, which will cause the pollen to fall directly onto the waiting plant below, is a good way to ensure success. Your corn will have ready tassels for about a week, and I just give them a good, hearty shake whenever I walk by them, at least once a day.
Vibrating pollination
My favorite method, because it is the most successful, fastest and most efficient, is vibrating plants to loosen the pollen and send it airborne so it will land on waiting female flowers. When you have plants with very small flowers like tomatoes, trying to identify female and male flowers and dissect them to get to the pollen is absurd. If you have open blossoms, you can hold anything that vibrates (toothbrush, massage gun, sex toy) against the plant and you will see the air fill with yellow pollen. Do this for ten seconds once a day and you’ll be find high rates of pollination. This method works fantastically on indoor hydroponic gardens that need pollination, but you can also use it outside on peppers, eggplants, cucumbers, tomatillos, and peas.
Late June means “summer” everywhere across America, and for most of us, summer gardens are in full swing already. In fact, most farmers have moved onto starting seed for fall and winter gardens. But if you’ve yet to get everything into the ground for whatever reason (and I’m frequently besieged by such reasons) it’s not too late. There are still lots of crops you can plant right now to yield a decent summer harvest. As a general rule, you’ll be skipping spring crops like peas, strawberries, bok choy, and spinach—it’s too hot for them. Instead, focus on buying really good-sized, established starts and succession planting.
Tomatoes, peppers, and eggplants
Luckily, it’s not too late to get these crown jewels into the ground, but that time is fast approaching. Peppers, in particular, need a long time to fruit, so only purchase well-established, good-sized plants, such as those in gallon-sized pots. While tomatoes don’t need as much time, I’d still focus on gallon-sized starts, and make sure plant them deep on a cloudy day or at sunset, so they have a little time to recover before being blasted by the full sun. If you can protect them from the sun with some shade for the first day, that’s even better. Eggplants, which tend to fruit later in summer, are fine to purchase in four-inch pots.
Lettuce, radishes, scallions, beets, and kohlrabi
These are succession crops and as such, they are fine to plant all summer long, as they are harvestable quickly (in under sixty days). When planting lettuce, look for packages that say “bolt resistant” or “heat resistant.” Also consider shadier spots for your lettuce.
Carrots
It’s not too late to plant carrots, but they’ll be hard to germinate, since they require constant moisture to do so. It may be worth getting starts at the garden center so you’ll have some to harvest come fall. If you do pick up starts, remember to separate them by hand before planting them a few inches apart.
Beans, pumpkins, squash, melon and cucumbers
Do not be deceived, this is actually the perfect, peak time to plant all of these vegetables. Beans can still be direct sowed (seeded directly in your garden), but pumpkins, squash, melon, and cucumbers should be purchased as starts.
Corn
It’s last call for corn, and if you’re going to plant it, buy starts. Even though corn is easy to germinate (and it grows quickly), you’re running out of roadway. The long-held saying, “knee high by Fourth of July” remains because if the corn hasn’t grown that much by early July, it simply won’t grow tall and husky enough by the time it needs to form ears, resulting in tiny, underdeveloped corn ears.
Flowers
It’s a great idea to think about late-season flowers. You can still direct seed zinnias, sunflowers, and other sturdy, tall flowers. There's still time to plant cosmos and salvia starts for this summer. It’s a great time to get perennials at the garden center and plant them.
Focus on fall
It’s a hard transition to make, but soon, you’ll be planting fall succession crops like broccoli and cauliflower again, and perhaps a fall succession of peas. So even if you’ve missed out on summer, look ahead instead and get seeds started in trays outside for planting out come late summer.
Most of us don’t live on farms with acres to spread out crops, but instead have a few boxes, planters, or a small plot to grow our gardens. As a result, we tend to cram as much as we can into the space. It's called “crowdscaping,” and not only does it stop plants from growing to their full potential, but it also risks an even bigger problem: cross pollination.
Bees and other pollinators are indiscriminate little flirts. It’d be nice if they took pumpkin pollen and made sure to visit other pumpkins first, but they move onto the next flower whether that's a tomato or dill. Usually, it isn’t an issue—pea pollen has no effect on tomatoes, for instance—but that isn’t always true. Some crops can cross pollinate, and the result is a plant with DNA characteristics of both parent plants. In other words: frankencrops.
Let's take corn, for example. Unlike most plants that rely on pollinators like insects, corn is pollinated by the wind. Corn plants grow tassels, which have pollen on them, and the wind blows the tassels and sends the pollen to fall on corn plants of the same variety. That same wind can carry corn pollen as far as a half mile (but generally, 20-50 feet is considered the usual distance, to be safe). In a home garden, you need to have enough corn in a block to have it pollinate itself (a six foot by six foot block is advisable), but you shouldn't plant multiple varieties of corn in your garden because the resulting ears can take on traits from both varieties, and it won't necessarily be the best traits of each. You can also control cross pollination by choosing two varieties that have wildly different periods of pollination, but that's tricky math to master, as pollination phasse are a result of many factors, most of which are beyond our control.
How to prevent frankencrops
Unlike corn, cross pollinating squash will affect next year’s crop instead of the current one. The vegetables formed by cross pollination won’t be altered, but the seeds will be. If you save seeds and plant them, next year’s crop will have traits of both parent squashes. I’ve seen it in practice, and it can be both interesting and frustrating: Friends grew mammoth squash one year, each weighing in over 100 pounds, but they were utterly tasteless and watery.
The good news is that this only happens within one species; cucumbers and squash don’t cross pollinate even though they're both cucurbits, for example. The following groups will cross pollinate each other and should be separated by as much as a half mile. Since that's impractical in most home gardens, it’s wiser to simply not seed save these crops:
Butternut, Buttercup, Banana, Hubbard and Turban squashes
Muskmelon, Cantaloupe, Charentais; Honeydew; Casaba; Armenian Cucumber; Snake melon (gourd)
Be careful with companion planting
In addition to cross pollination, you also want to consider which plants do and don't benefit from companion or co-planting (planting near each other). Some pairings can have a dramatic effect on how well each plant flourishes. The term for these plants is "allelopathic," which just means they produce chemicals that are problematic for other types of plants. Planting members of the nightshade family (eggplant, tomato, pepper) near cruciferous plants (cabbage, broccoli, cauliflower, kale) risks both plants. However, some plants, like beans, benefit almost every other crop by being nearby.
As you plan your garden, be aware of how you space your plants and what seeds you save. For some crops, like squash, you want to ensure you are getting every single fruit, no matter how small, into the compost pile so it doesn’t have the ability to sprout. Even if you don’t intend to save seeds, paying attention will prevent you from mangling a crop through cross pollination or bad companion planting.
Ordering mistakes frustrated customers during nearly three years of tests. But competitors like White Castle and Wendy’s say their A.I. ordering systems have been highly accurate.
By studying bees and their honey near decomposing human tissue, researchers at George Mason University hope to give crime scene investigators a new tool for finding the hidden dead.
Researchers at George Mason University’s new “body farm” in Northern Virginia hope to use bees to draw up a formula for human decomposition that investigators can use to narrow a search for human remains.
Plants come in two varieties: annuals, which will survive for a season, and perennials, which should come back year after year. Many of the plants in your vegetable garden, from carrots to tomatoes, are annuals, but you can grow quite a lot of perennial crops too.
In my book, growing your own perennial food forest—an enduring source of nourishment— of perennials is a sign of a true gardener. Here are all the edible perennial plants I recommend adding to your yard. (Note: Plants are all susceptible to weather, so which plants will "perennialize" is dependent on the USDA planting zone you live in. In some places with harsh winters, artichokes are treated as annuals, for instance. Talk to someone at your local garden center to learn what perennial plants will thrive in your zone.)
Berries
Most berry plants are perennials, including strawberries (in most ones). Planting a diversity of both June bearing (that is, plants that fruit in June) and ever bearing (plants that fruit all summer) strawberries mean you should have a full summer of berries. But strawberries aren’t the only game in town: Blueberries are outstanding shrubs that thrive in full sun or partial shade, and don’t require too much water. There are hundreds of varieties, and if you plant a mix of early, mid, and late varieties, you’ll have blueberries from June to August.
Other berries grow on bushes as well, from currants, goji berries, thimbleberries, gooseberry, honeyberry, salmonberry, huckleberry, and more. Elderberries grow on shrubs that can reach 30 feet tall within a few years. Then there are all the cane-based berries, like raspberry, blackberry, boysenberry, marionberry, loganberry and tayberries; these plants need support, like a trellis, but will grow prolifically and spread easily (with a little care, you can keep them in check).
Fruit and nut trees
Well cared-for Apple and pear trees will last for generations, providing harvests year after year. The same is true of stone fruits like apricot, peach, cherry, and nectarine. I’d can't imagine my garden without a fig tree in it—although like elderberry, they can grow to immense heights if you don't keep them under control.
Within each type of fruit are many varieties that provide variance in terms of taste and timing of harvest. The same is true for nut trees—including almonds, walnuts, pecans, filberts, and other nuts. These trees can also provide a canopy over other parts of your garden, benefitting plants that thrive in the shade.
Asparagus
An absolutely fascinating vegetable, asparagus is generally planted as a root in a ditch; each spring, it will send up the shoots we recognize as asparagus. (While you can grow asparagus from seed, it takes a few years for the spears to be ready to be plucked, so most people purchase crowns instead.) Watching my asparagus bed reappear each April is a delight; the crowns keep coming back, and an asparagus plant can live for 15-20 years.
Rhubarb
A funny looking plant prized for its stalks, rather than its leaves or fruit, rhubarb grows from a rhizome. The stalks will have a green-red color, but you can blanche them stalks early in the growing process to get those prized cherry red stalks. Rhubarb is harvestable from spring through early fall, and is slow to spread. It’s an ideal plant to put under trees (in the understory), as the less sunlight, the brighter red it will be.
Horseradish
Unlike rhubarb, horseradish is a taproot, and spreads quickly via a network of underground roots. Every spring it will shoot up tall green leaves which can also be eaten. At any time, you can dig up one of the roots to harvest it. As horseradish loses its spice the moment you cut into it, having fresh horseradish at your disposal is a real delight. You can even replant part of a root; it should take hold and produce more plants. Like rhubarb, horseradish is a great plant for an understory.
Artichokes
I dreamed of a garden full of artichokes my whole life, and now that I have one, it is as wonderful as I imagined. Artichokes slumber all winter, but come early spring, they come to life, growing as tall as seven feet, with sprawling silver-grey leaves. Shoots then appear, and at the end of each shoot, an artichoke. Each plant will produce a large artichoke, and then each successive one will be a bit smaller. Artichokes you don’t pick will open and flower into magnificent purple bee havens. They make a spectacular border plant when clustered together.
Fennel
You can’t kill fennel. I’ve tried. And it can’t be grown with anything else, as it will keep other plants from flourishing. Even worse, it grows via a taproot and spreads easily. So why do you grow it? Because fresh fennel is lovely, and when fennel is allowed to go to seed, it produces bright yellow pollen you can harvest to use in cooking (and to save your own fennel seeds). Bees also adore fennel.
Egyptian walking onions
The most fantastical vegetable there ever was, walking onions throw up a singular green stalk from the onion bulb in the soil. At the end of the stalk, three tiny onions will grow, flopping around in the air, until they are heavy enough to lean the plant over, where they will implant themselves in the soil and start over—hence the “walking” name. You can harvest either the bulb in the soil or the ones at the top of the plant. (I give my walking onions more space than I should because when I’m waiting for other things to sprout or fruit in late May-early June , the architecture of the walking onions keeps me amused.)
Saffron
The red stamens used to delicately flavor and color rice are actually from crocuses. You can buy them as bulbs and watch them flower, and then harvest the red stamens for your own saffron bounty. It’s important to put these bulbs where you can watch and access them so you don't miss your shot at a harvest, so planting boxes are a perfect choice.
Herbs
Perennial herbs are the ultimate edible perennial staple. Bay leaves, rosemary, lavender, sage, mint, thyme and plenty more can be grown year round as hardy shrubs. In some cases, you can successfully perennialize herbs like parsley and dill, which means that they continually seed themselves and come back on their own, though this requires continually seeding in the same place for a few years until they take hold, and a bit of luck.
Ramps
A relatively recent development, you can now purchase ethically farmed ramp bulbs specifically to grow in your own garden (I usually find them on Etsy). This means you'll have your very own ramp patch that will grow every year (if you're careful about harvesting them). Ramps need dappled light and a lot of moisture, so grow them alongside mushrooms.
Mushrooms
There are a multitude of ways to grow mushrooms, whether in buckets, on logs, or just by throwing spawn down on your wood chipped pathways. Having access to mushrooms, which flush in waves, is economical, if nothing else, and there’s something magical about going outside and find new shiitakes or wine cap mushrooms in my yard. Mushrooms require dappled light, which means you have to make them an understory plant.
Other plants that may perennialize
Other edible plants can become perennials if you can get them into a cycle of reseeding themselves, including potatoes and sweet potatoes—if you leave some small potatoes behind when harvesting, you’ll find the bed will regenerate come spring. Radicchio will often find a way to come back year to year, and onions may perennialize if you allow them to go seed, as might celery. I've had less luck with broccoli species that are claimed to return each year.
One of the best ways to define a garden space is with a path. Before considering hardscape options like concrete or stones, consider some cheaper options. Softer options like wood chips, clover or recycled pavers are all going to be better for the garden, easy to upkeep, and richer visually.
Wood chips are an ideal ground cover for walkways
There’s just no end to the benefits of wood chips in your garden. They’re easy to get for free, they have superb drainage so they’re easy to walk on even in wet weather, and as they compost, they feed your soil. Use enough of them and they’re a weed suppressant, and mulch the ground so it retains moisture and soil. The contrast of color they have to grass, clover or other ground cover help to define a pathway. Upkeep is as simple as raking them out so they're flat, and occasionally topping up the pathway with new wood chips (I’ve found once a year is sufficient).
Start by defining where the walkway will be, using something long and flexible, like a garden hose. Remove grass or other groundcover in the space, and then use flattened cardboard as a base to smother any remaining seeds in the ground. Cover with four to six inches of wood chips, and rake them to be nice and flat. You can simply walk back and forth over them to settle them in. Large chips stay in place really well, but you can use garden edging to maintain lines if you prefer.
Clover makes a luxurious pathway to walk on
Everyone always thinks of grass for soft, green garden paths, but grass is expensive to upkeep, a lot of work to maintain and terrible for the soil. Worse, it’s miserable to walk on when it’s wet. One winter can kill the grass and make the path a muddy mess. Instead, use clover. It requires no mowing, very little water, and if you use a perennial variety like white clover, creates an incredibly thick mat that will stand up to the rain and snow. You can mow it, like lawn, if you’re a masochist who loves their mower. Otherwise, just let it grow and feed the bees and other pollinators. Clover will spread, so keeping it in line using curbing makes sense.
You can always get recycled pavers for free
Someone in your neighborhood is trying to get rid of pavers, right now. Check NextDoor, Craigslist or Facebook: I guarantee you someone is currently dismantling a wall or chimney or just has a random pile of bricks that’s been in their backyard, and it can be yours, for free. For straight pathways, bricks and the grid they create can be a powerful architectural detail in your yard. For curved spaces, you can place the bricks straight on and then easily cut the curves out of the finished pathway, or align the bricks to the curves using a formula. In either case, you’ll want to dig out any grass or other groundcover, and start with a base of compacted sand that is level. This is followed by the bricks, and then the bricks can be filled in with paver sand, which actually locks the pavers in place.
CISA has released the new version of the SAFECOM Guidelines. This exclusive guideline talks about the Emergency Communications Grants in cooperation with SAFECOM and NCSWIC. The new version aims to give the correct information to businesses globally.The National Council of Statewide Interoperability Coordinators (NCSWIC) and the Cybersecurity and Infrastructure Security Agency (CISA) work closely together to develop and maintain the SAFECOM Guidelines.According to the guidelines, the collaboration between the agencies goes into great detail about financial requirements, eligibility requirements, and technical requirements.
The New CISA SAFECOM Guidelines
The new SAFECOM guidelines help state, local, tribal, and territory governments secure federal money for crucial emergency communications projects is its main goal. Billy Bob Brown, Jr., Executive Assistant Director for Emergency Communications at CISA, stated: "The SAFECOM Guidance on Emergency Communications Grants is an essential resource that supports our collective efforts to strengthen the resilience and interoperability of emergency communications nationwide." The guidance aims to provide a seamless experience to governments and agencies while also receiving new updates every year. These updates include new developments in technology and online risk management. It guarantees that grantees have access to the most recent guidelines and specifications required to construct reliable, safe, and compatible communication networks. By adhering to these standards, recipients can maximize government funding by ensuring that investments align with both national and community interests."Incorporating SAFECOM Guidance into project planning not only enhances funding prospects but also strengthens the overall emergency response capabilities of our communities," Brown said. The document encourages stakeholders to adopt best practices in the planning, organizing, and execution of emergency communications projects to foster a uniform strategy across all governmental levels and public safety groups.
SAFECOM and Federal Agencies
Federal organizations such as the Office of Management and Budget and the Department of Homeland Security have acknowledged the SAFECOM Guidance as a vital resource since its establishment. Grant candidates are encouraged to utilize the SAFECOM Guidance to ensure that their projects are in line with state, local, tribal, or territorial emergency communications strategies. To address the diverse needs of public safety organizations and communities, the research places a strong emphasis on the integration of new technologies, cybersecurity measures, and interoperable communication systems.Through the SAFECOM website, CISA offers resources and information on comprehending federal grant criteria to further assist stakeholders. The team is still dedicated to helping applicants create thorough plans that both satisfy funding requirements and improve emergency infrastructure's overall resilience.
I’ve built raised garden beds out of railroad ties or cedar fencing, 2x4s, bricks and even a beautiful woven lattice. But when I got serious about not having to build new raised beds every few years, I developed a simple, sturdy design that anyone can follow.
It is the only way I’ve bothered making raised beds for the last 10 years, regardless of where I was building them—the Arizona desert, rainy Pacific Northwest or suburban Georgia. This design will provide you with a financially reasonable and technically easy way to get beds together quickly for any sized space. It offers a better amount of bed depth than most plans I see, and requires very few tools. The sturdiness of the beds mean they won’t move over time, lean over, and are impervious to getting dinged up by your wheelbarrow.
Use the right wood
The most common mistake I see for raised bed building is not choosing the right wood. A lot of time is often spent on considering pressure treated (PT) wood versus untreated, or what variety of wood—cedar versus redwood. But the biggest problem is that people generally get lumber that's too thin and/or small. Messing around with cedar pickets, which are thin and flimsy, or 2x4s, which don’t give you any vertical height, doesn’t serve you long-term. The answer is to go large: I use 2x12s or 2x10s. This means that you need fewer planks of wood stacked vertically. I don’t use pressure-treated wood, because even though the methods they use currently to treat the wood aren’t considered toxic, I go out of my way to not introduce unneeded chemicals into my edible garden.
While you can use variety you want, and hardwoods or cedar will certainly last longer, it’s not essential. Using pine or redwood, in planks of wood this beefy, will still last eight years or longer. When the wood breaks down, it benefits your garden because it’s essentially compost, and by keeping the beds inexpensive and easy to make, creating new ones in eight to 10 years won’t seem cumbersome.
Check out suppliers other than big box stores
Big box stores aren’t the only game in town for getting wood. Look specifically for lumber stores and get some prices, or—my favorite hack—hit up Craigslist for independent millers selling “rough cut” wood.
The benefit of independent millers (people with their own saw mill or setup) is that the wood is likely to be cheaper, and you might get a deal for all the cuts you need. Also, independent millers don’t cut everything down to the same length just for uniformity, like you get at Home Depot. As they’re slicing a tree into 2x12s, if the plank ends up being 15 feet long, and you only need 12, they don’t chop the last three feet off, because it’s just more work, and there’s no benefit to doing it. As a result, you get longer cuts for the same price, while supporting someone local. While I don’t see it as a downside, this wood is usually “rough cut"—it hasn’t gone through a sanding process to make the sides smooth. They also have not been kiln dried as they would be for a big box store, meaning they still hold a lot of moisture. For the purpose of building raised beds, neither of these issues is a problem. The raised beds will live outside under constant watering, and really doesn’t require the smooth sides. I actually prefer the rough cuts; I think it makes the beds less inviting to pests.
Determining the size of your beds
A raised bed is a rectangle. That rectangle can be any length you want; you are limited only by the length of wood planks you can obtain (12 or 16 feet is common). However, in terms of the width of the bed, you want to think really hard about making it any wider than four feet (but anything in the two to four foot range is fine). There’s a simple reason: You have to be able to reach everything in the middle of the bed, and anything wider than four feet makes that quite difficult. The height of the bed will always be 22 1/2” tall, because we’ll use two 2x12s stacked vertically (and 2x12s are actually only 11 ½” once dried). Consider, as you are designing the beds, if the space you are putting them in slopes dramatically, as this might mean breaking a long bed into two, so you can terrace the ground for each bed. Make sure you allow at least three feet between beds, but four feet is better. This will allow you to maneuver a wheelbarrow through the aisles, which you’ll find really helpful. Don’t be afraid to grab some landscaping flags to lay out where the beds will go and just walk around, making sure you can reach everything and it’s comfortable to walk around.
Sketch out the entire space, laying out the final dimensions of the beds. This is going to help you visualize the wood you need. For each bed, you’ll need one 2x12x16 for the shorter sides, and then two 2x12s for each of the longer sides, at whatever length you design the beds to be. Ideally, you get planks a little longer than the beds, so you can square off the ends of the planks.
Credit: Amanda Blum
Determine how much wood you'll need
The planks you lay horizontally will need vertical supports to keep the bed together. You’ll place these in every corner, and then every four feet of length along the long side. For an eight-foot-long bed, you need one additional vertical support in the middle. For a twelve-foot bed, you need two additional supports. This support is just a 2x4 that is 20” tall (roughly the same height as the beds). Add up the lengths to determine how much vertical plank you need. For instance, on an eight-foot bed, you need six vertical supports, which is 144” or a 2x4x12’ plank. For beds that are longer than 12 feet, I like to put in some additional bracing in the middle of the bed, all the way across the width. This helps stop the bed from bowing in the middle over time. The brace is just additional 2x12s, stacked vertically, the entire width of the bed.
Credit: Amanda Blum
The tools you’ll need
The beauty of this design is that you need very few tools. You’ll benefit from a chop saw, but a circular saw will do in a pinch. Also: a power drill, wood glue, 2 ½” construction screws and a power sander, and the sander is optional. While you can get your cuts done at a big box store, you’ll save a lot of money doing it yourself, and it’s very likely you’ll make at least one mistake on the cuts you need, so having the ability to make cuts where you’re building is very helpful. The sander is used on corners to round sharp edges. This helps reduce clothing getting caught or getting scratches as you walk around the corners of the beds, but isn’t essential. Since you’ll be using construction screws, you won’t be pre-drilling anything (and construction screws come with the right drill bit in the package), but a decent power drill, even a hammer drill, is absolutely essential. While not essential, I benefited a lot from buying corner clamps so that I could get a real 90-degree corner on my beds.
The build
This is obvious, but lumber is dimensional: You’re not joining up two sheets of paper. Where two pieces of wood meet in a corner (where they join), you have to be deliberate about which piece of wood is on the “outside,” through which you’ll screw into the other piece of wood. The shorter pieces should always live on the outside, and you screw through the short side, into the longer piece of wood. Because of this, when accounting for the real length of the wood you need for those long sides, you deduct the three inches (1 ½ inches from either end) because the width of the short end of the wood makes up the difference. In an eight-foot bed, rather than the long pieces of wood being 96”, you’d make them 93”. When they butt up against the short sides of the bed, they end up being 96” total length.
Start on a flat surface, and build the first level of the bed. Join one corner, using the clamps if you have them, making sure the short length of wood is on the outside. Take the time and care to make sure the cuts are all 90 degrees, and the wood is lined up precisely. Use wood glue between the two pieces of wood. Using your drill, screw through the shorter piece of wood into the longer piece of wood. Use two screws for this, one four inches off the ground and a second about eight inches off the ground. Be sure to place the screws an inch away from the edge of the wood, and ensure you are screwing perpendicular to the wood, so it goes in straight. Continue going around the bed screwing the corners together until you have a complete rectangle. Do this a second time, so now you have two rectangles. You can usually just put the second one together on top of the first, as they should be replicas of each other.
Where to screw through woodCredit: Amanda Blum
Next, put in your vertical supports. Place a 2x4 cut to 20” in each corner vertically. Put the longer side of the 2x4 along the longer side of the bed. Now, screw through the bed from the outside, into the vertical support, placing four screws on each side of the corner. Go around and do this in all four corners, and then every four feet along the length. The vertical support won’t be as tall as the bed—it should be a little bit shorter. This will hide the supports once you have soil in the bed, for a cleaner look.
Where to put screwsCredit: Amanda Blum
If the bed requires bracing in the middle, take another measurement of the distance between the width of the bed, and then cut two 2x12” inch pieces to that length. Put them in place with wood glue, and then screw from the outside of the bed into the ends of the 2x12s.
Now, move the bed into place. What I like about this process is that once you put the bed down, you’ll see precisely where you might need to level the ground a bit and can just do so with a shovel, with the bed in place. Lift the bed, dig it out a bit, and put it back down. You don’t need to be precise about pre-leveling the space. Fill the beds with good soil, and you’re ready to go. These beds are sturdy enough that you can tip a wheelbarrow into them and not damage the bed.
You can take a sander to the corners to smooth them out a little—a power sander makes very quick work of this. I don’t stain or seal my raised beds, because I don’t want to introduce anything that can leach into the soil. However, there are whey-based stains that are okay to use in this instance.
Guidehouse Inc., based in McLean, Virginia, and Nan McKay and Associates, headquartered in El Cajon, California, have agreed to pay settlements totaling $11.3 million to resolve allegations under the False Claims Act.
The settlements came from their failure to meet cybersecurity requirements in contracts aimed at providing secure online access for low-income New Yorkers applying for federal rental assistance during the COVID-19 pandemic.
What Exactly Happened?
In response to the economic hardships brought on by the pandemic, Congress enacted the Emergency Rental Assistance Program (ERAP) in early 2021.
This initiative was designed to offer financial support to eligible low-income households in covering rent, rental arrears, utilities, and other housing-related expenses. Participating state agencies, such as New York's Office of Temporary and Disability Assistance (OTDA), were tasked with distributing federal funding to qualified tenants and landlords.
Guidehouse assumed a pivotal role as the prime contractor for New York's ERAP, responsible for overseeing the ERAP technology and services. Nan McKay acted as Guidehouse's subcontractor, entrusted with delivering and maintaining the ERAP technology used by New Yorkers to submit online applications for rental assistance.
Admission of Violations and Settlement
Critical to the allegations were breaches in cybersecurity protocols. Both Guidehouse and Nan McKay admitted to failing their obligation to conduct required pre-production cybersecurity testing on the ERAP Application.
Consequently, the ERAP system went live on June 1, 2021, only to be shut down twelve hours later by OTDA due to a cybersecurity breach. This data breach exposed the personally identifiable information (PII) of applicants, which was found accessible on the Internet. Guidehouse and Nan McKay acknowledged that proper cybersecurity testing could have detected and potentially prevented such breaches.
Additionally, Guidehouse admitted to using a third-party data cloud software program to store PII without obtaining OTDA’s permission, violating their contractual obligations.
Government Response and Accountability
Principal Deputy Assistant Attorney General Brian M. Boynton of the Justice Department’s Civil Division emphasized the importance of adhering to cybersecurity commitments associated with federal funding.
"Federal funding frequently comes with cybersecurity obligations, and contractors and grantees must honor these commitments,” said Boynton. “The Justice Department will continue to pursue knowing violations of material cybersecurity requirements aimed at protecting sensitive personal information.”
U.S. Attorney Carla B. Freedman for the Northern District of New York echoed these sentiments, highlighting the necessity for federal contractors to prioritize cybersecurity obligations. “Contractors who receive federal funding must take their cybersecurity obligations seriously,” said Freedman. “We will continue to hold entities and individuals accountable when they knowingly fail to implement and follow cybersecurity requirements essential to protect sensitive information.”
Acting Inspector General Richard K. Delmar of the Department of the Treasury emphasized the severe impact of these breaches on a program crucial to the government’s pandemic recovery efforts. He expressed gratitude for the partnership with the DOJ in addressing this breach and ensuring accountability.
“These vendors failed to meet their data integrity obligations in a program on which so many eligible citizens depend for rental security, which jeopardized the effectiveness of a vital part of the government’s pandemic recovery effort,” said Delmar. “Treasury OIG is grateful for DOJ’s support of its oversight work to accomplish this recovery.”
New York State Comptroller Thomas P. DiNapoli emphasized the critical role of protecting the integrity of programs like ERAP, vital to economic recovery. He thanked federal partners for their collaborative efforts in holding these contractors accountable.
“This settlement sends a strong message to New York State contractors that there will be consequences if they fail to safeguard the personal information entrusted to them or meet the terms of their contracts,” said DiNapoli.
“Rental assistance has been vital to our economic recovery, and the integrity of the program needs to be protected. I thank the United States Department of Justice, United States Attorney for the Northern District of New York Freedman and the United States Department of Treasury Office of the Inspector General for their partnership in exposing this breach and holding these vendors accountable.”
Initiative to Address Cybersecurity Risks
In response to such breaches, the Deputy Attorney General announced the Civil Cyber-Fraud Initiative on October 6, 2021. This initiative aims to hold accountable entities or individuals who knowingly endanger sensitive information through inadequate cybersecurity practices or misrepresentations.
The investigation into these breaches was initiated following a whistleblower lawsuit under the False Claims Act. As part of the settlement, whistleblower Elevation 33 LLC, owned by a former Guidehouse employee, will receive approximately $1.95 million.
Trial Attorney J. Jennifer Koh from the Civil Division's Commercial Litigation Branch, Fraud Section, and Assistant U.S. Attorney Adam J. Katz from the Northern District of New York led the case, with support from the Department of the Treasury OIG and the Office of the New York State Comptroller.
These settlements highlight the imperative for rigorous cybersecurity measures in federal contracts, particularly in safeguarding sensitive personal information critical to public assistance programs. As the government continues to navigate evolving cybersecurity threats, it remains steadfast in enforcing accountability among contractors entrusted with protecting essential public resources.
Many pregnant women who struggle with drugs put off prenatal care, feeling ashamed and judged. But as fatal overdoses rise, some clinics see pregnancy as an ideal time to help them confront addiction.
Kim Short, pregnant and staying at a sober living house, has struggled with drug and alcohol use since her early teens.
Enlarge/ Ten milligram tablets of the hyperactivity drug, Adderall, made by Shire Plc, is shown in a Cambridge, Massachusetts pharmacy Thursday, January 19, 2006. (credit: Getty | Jb Reed)
The Centers for Disease Control and Prevention on Thursday warned that a federal indictment of an allegedly fraudulent telehealth company may lead to a massive, nationwide disruption in access to ADHD medications—namely Adderall, but also other stimulants—and could possibly increase the risk of injuries and overdoses.
"A disruption involving this large telehealth company could impact as many as 30,000 to 50,000 patients ages 18 years and older across all 50 US states," the CDC wrote in its health alert.
The CDC warning came on the heels of an announcement from the Justice Department Thursday that federal agents had arrested two people in connection with an alleged scheme to illegally distribute Adderall and other stimulants through a subscription-based online telehealth company called Done Global. The company's CEO and founder, Ruthia He, was arrested in Los Angeles, and its clinical president, David Brody, was arrested in San Rafael, California.
On Monday, Apple announced it would be integrating OpenAI's ChatGPT AI assistant into upcoming versions of its iPhone, iPad, and Mac operating systems. It paves the way for future third-party AI model integrations, but given Google's multi-billion-dollar deal with Apple for preferential web search, the OpenAI announcement inspired speculation about who is paying whom. According to a Bloomberg report published Wednesday, Apple considers ChatGPT's placement on its devices as compensation enough.
"Apple isn’t paying OpenAI as part of the partnership," writes Bloomberg reporter Mark Gurman, citing people familiar with the matter who wish to remain anonymous. "Instead, Apple believes pushing OpenAI’s brand and technology to hundreds of millions of its devices is of equal or greater value than monetary payments."
The Bloomberg report states that neither company expects the agreement to generate meaningful revenue in the short term, and in fact, the partnership could burn extra money for OpenAI, because it pays Microsoft to host ChatGPT's capabilities on its Azure cloud. However, OpenAI could benefit by converting free users to paid subscriptions, and Apple potentially benefits by providing easy, built-in access to ChatGPT during a time when its own in-house LLMs are still catching up.
Un análisis de las vocalizaciones de los elefantes mediante una herramienta de inteligencia artificial sugiere que pueden utilizar y responder a retumbos individualizados.
The organ, from a genetically modified animal, failed because of a lack of blood flow, surgeons said, but did not appear to have been rejected by the body.
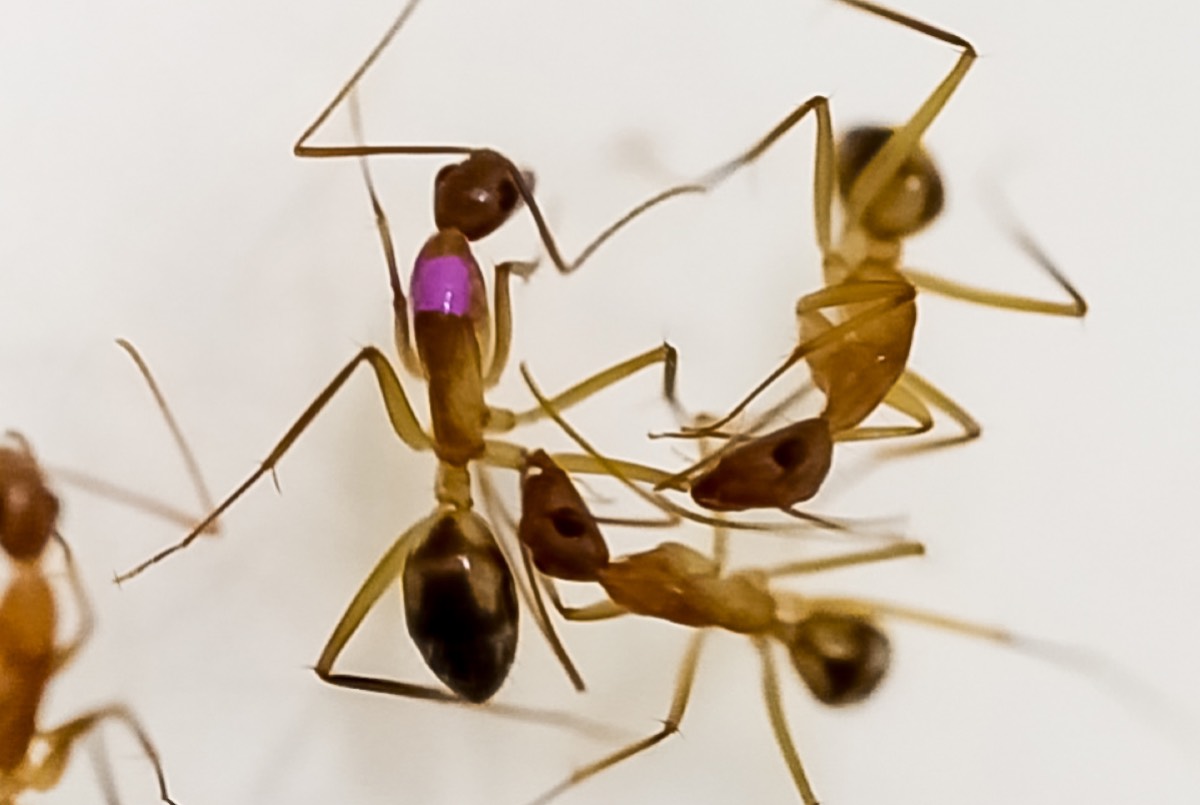